Post
How to make your own soap
Cold Process Soap
As the potentially dangerous long-term effects of antibacterial soaps become more widely known, people are turning to more natural alternatives. This movement has resurrected the art of soap making so if you are new to making soap you are in for a real treat. It can seem like a daunting undertaking at first but it is such a rewarding process. A lot of boutique soap-makers charge an arm and a leg for there all-natural soaps but you don’t have to take out a loan to buy healthy soap for your entire family and you can still ditch the antibacterial soaps, by making your own homemade cold process soap! Soap is a chemical reaction that occurs as a result of mixing an animal or vegetable fat with a base (sodium hydroxide) – this chemical reaction is called saponification. Saponification is “the hydrolysis of a fat by an alkali with the formation of a soap and glycerol.”
What does that mean? Each fat has a unique combination of triglycerides. Triglycerides are compounds made up of a single molecule of glycerol and 3 fatty acids. Each combination requires a different amount of alkali to complete the saponification process and the alkali in soap-making is sodium hydroxide, also known as lye. The lye is mixed with water to create a basic solution, this solution is then mixed into your fats, as they are combined and begin to react, the glycerol molecule is separated from the fatty acids, the fatty acids then react with the hydroxide ions in the lye solution and this is saponification. The two resulting products of the saponification process are glycerin, which is wonderfully moisturizing for the skin, and soap. Not to worry, no lye remains as it has all reacted with the fats to create a completely new substance.
Cold Process Soap vs. Hot Process Soap
The method you choose is a matter of personal preference and this post is to teach you about cold process soap, but you can take the same recipe and use the hot process method instead – just do some research first. Both of these methods begin in the same way, you make a lye/water solution and mix it with the oils to begin saponification. To make cold process soap you would incorporate any of your additives and pour it into the mold as soon as it reached ‘trace’ (I’ll explain trace later). For hot process soap you would let the soap batter “cook” in a slow cooker on the lowest heat to accelerate and complete saponification, then you would stir in your additives and mold it. Cold process soap takes 4-6 weeks to completely saponify and be ready to use and in theory, hot process is ready to use immediately – however, it is wise to let it sit a week or so to harden a bit as this will make it last considerably longer. I have made soap both ways and I prefer the cold method mainly because I find cold process soap is easier and safer to pour into the molds so if you are trying to use a mold with a design or pattern I would recommend cold process. Both methods are great and in the end you get the same result, soap!
Working with LYE
Are you worried about working with Lye? Unfortunately, it isn’t possible to make proper soap without lye in some part of the process. Lye is the necessary agent for saponification and any true soap – even one you buy – is made with it, you can however purchase a pre-made soap base, but it is much less budget friendly. Lye is used to make all soap, even melt and pour soap bases were originally made with lye. There is a common misconception that soap is not natural or healthy if it is made with lye – this simply isn’t true. It is necessary to use lye to achieve the chemical reaction, but you can be assured that when done correctly, no lye remains in your finished product. I would guess that working with lye is the greatest deterrent for people who are thinking about making soap and I can understand how this would be a stumbling block but, if you know and follow proper safety measures, you shouldn’t have any problems working with it.
Lye safety measures:
1)Wait until your children are in bed as making soap is not an activity to do with children around (watch out for pets as well). Children and pets can cause distractions and/or spills.
2) Wear long sleeves and protective gear including safety glasses and rubber gloves.
3) Make sure your workspace is open and completely free of clutter that could cause a spill, also remove anything that would be ruined if a spill were to happen.
4) When the lye and water are mixed it will create fumes. Do this step in a VERY well-ventilated area or even outside. I do it outside so there is no concern about fumes and then if I were to spill (which thankfully I haven’t yet) it would not be in my home.
5) Always add lye to the water – DO NOT EVER add the water to the lye as it will create a caustic eruption! It MUST be done in this order every single time.
Hopefully these safety tips make you feel more comfortable about working with lye. The first time is a bit nerve-wracking but once you have done it you will see that it is not so frightening, just remember to follow the safety tips and always use exact measurements.
Soap-Making Ingredients
The most basic ingredients you will need are water (distilled is best), lye (sodium hydroxide), and some type of animal or vegetable fat (such as olive oil or tallow). These three ingredients are essential and it is wise to use a lye calculator – www.soapcalc.net is a great website to become familiar with in order to accurately determine the ratios needed for proper saponification. Measurements must be extremely accurate. There are countless combinations of oils you can come up with for a soap recipe and each fat or oil will have it’s own impact on your finished product. Some are great cleansers while others are more gentle and moisturizing, and some make large bubbles as opposed to others that create a low lather and you can use all of one type of oil or a mixture of several different ones. A pure olive oil soap, also called castile soap named for a region in Spain, makes a very gentle bar of soap while a pure tallow soap has high cleansing ability and makes a great laundry bar. I have been trying many different combinations and that soap calculator has everything you need to start tinkering with recipes. I like to use at least three or four different oils to give the soap a bit more character and when you blend oils, it is much easier to achieve the qualities you are desiring in your soap. Some of the most popular soaping oils are coconut oil, olive oil, hemp seed oil, grape seed oil, castor oil, cocoa butter, mango butter, sunflower oil, sweet almond oil, jojoba oil. If this will be your first time making soap, a good place to start would be to use olive oil, coconut oil, and castor oil as this combination will give you a mild soap with a good lather and these oils are easy to find locally.
Optional Ingredients
Other ingredients can be added to customize your soap recipe such as essential oils, activated charcoal, hemp hearts, bentonite clay etc. These get added after trace and are a natural option for giving your soap a lovely scent or some exfoliating properties. Clays add a silkiness to the soap that is especially good for shaving and sea salt soap or hemp hearts are extremely exfoliating and detoxifying. Ground coffee, oatmeal, and botanicals like dried lavender flowers or herbs give a nice texture to the soap as well. For a natural colorant you can try adding mica powders, cocoa powder, turmeric, or spirulina. As you learn more about soap making you can even experiment with alternate liquids such as goat milk, herbal tea, or even beer.
Cold Process Soap Making
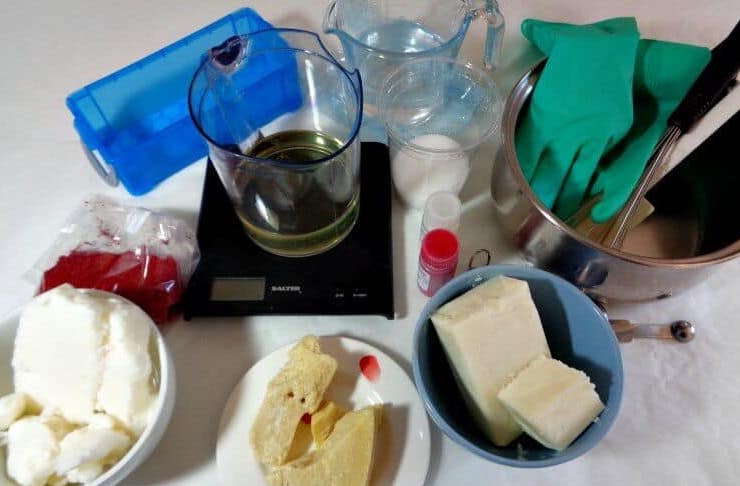
Now that we’ve got all those details out of the way, let’s get down to making soap, and more specifically, cold process soap. ***Big tip forsaving money – all the items listed below with the exception of the safety glasses, sodium hydroxide and clear (white) vinegar, can be purchased at thrift stores like Value Village, Goodwill, or Salvation Army***. First let’s discuss the tools/equipment you will need. I have a set of tools I keep just for soap-making and I strongly suggest you do the same as it eliminates any possibility of not getting your tools clean enough for food preparation. You will need a Non-reactive pot or slow-cooker for warming the oils, a large (4 cups at least) thick glass measuring cup for mixing the lye/water solution, a second glass jar for measuring the dry sodium hydroxide, an infrared thermometer (or 2 meat thermometers), silicone mold(s) of any shape(s) you desire, a digital scale, a stick blender, a large metal spoon, a silicone spatula (not a wooden spoon), safety glasses and rubber gloves, sodium hydroxide/lye (I get mine at soapandmore.com) and finally some clear vinegar for the clean-up. It’s time to ditch the antibacterial soap and make your own beautiful, healthy, cold process soap at home.
The preparation/cooking time is only about an hour but the resting and curing time is 30 to 36 days in order to ensure the soap sets properly and that all the lye has been removed. I feel it is much better to know precisely what is in my soap (and my shampoo, by the way), which is why I make it myself. Once you have selected your ingredients and are satisfied with the measurements and final product ratings of your recipe on soapcalc.net, simply follow these instructions, and you are on the road to creating a soap that will make you feel much healthier after your shower or bath, each and every time!
Trace
What is ‘trace’? Most soap recipes mention that you need to blend the caustic soda (lye/water) and oils together until you reach trace meaning that you will need to blend until there is no separation left in the mixture. If the caustic soda and oils are not completely mixed, your oil will separate in your molds and leave pockets of lye, producing a clean piece of garbage. Once your mixture has reached a light trace it will resemble cake batter, a medium trace is more like pudding but still pourable, and a thick trace holds its shape. When you have gone as far as a thick trace, your soap will likely have to be spooned into the mold which is not fun but doesn’t seem to change the final product much. Medium trace is ideal. You can tell when you have reached a medium trace by lifting your blender out of the mixture (while it is in the OFF position of course) and observing how the drips are behaving. They should leave a trail or “trace” on the surface.
Instructions
– Prepare your mold, if using a wooden mold it will need to be lined with parchment paper or wax paper. Silicone molds are ready to use as is and are super easy. You can also use any box if you line it with parchment paper, wax paper, or an extra thick garbage bag.
– Put on your protective gear, place a glass jar on the scale, and tare the scale. Pour the needed amount of distilled water into the jar and set aside.
– Put a second jar on the scale and tare the scale. Now very carefully pour the lye into the second jar until you reach the exact needed weight.
– In a well-ventilated area or outside, slowly pour the lye into the water and stir the mixture until all the lye is dissolved. It will become quite hot so be careful if you need to move it.
– Let this mixture sit and cool to between 100-120 degrees. While the lye is cooling, measure all other ingredients EXCEPT any essential oils, and slowly warm them together in a stove top pot or a slow-cooker.
– Once the oils are completely melted, remove from the heat and let them cool to between 100-120 degrees. Use an infrared thermometer every 5-10 minutes to test the temperature or place a meat thermometer in each container. If one is cooling faster than the other just put your oils back on the heat source to slow the cooling process a bit. Ideally, you want both the lye/water mixture and the oils to be between 100-120 degrees and within 10 degrees of each other.
– When the temps match up, carefully pour the lye/water into the oils and plug in your stick blender. BEFORE you turn your stick blender on, make sure the blade is completely under the mixture or you will splash it everywhere.
– Use the stick blender to bring the batter to a light trace, it should be slightly thick and resemble cake batter.
– If using any essential oils, blend them in now by pulsing the immersion blender a few times, this should bring the mixture to a medium trace. If you don’t use essential oils, just pulse your blender a few more times to bring it to medium trace.
– Pour the soap batter into your prepared mold, using a spatula to get it all out and remember that the soap is not fully “cooked” at this point and could still irritate your skin so you should still be wearing your safety gear.
– Put the mold somewhere out of reach where it can sit for 24 hours.
– Place an upside down cardboard box over the soap and cover with a towel and let it sit for 24 hours.
– Remove your soap and cut it, if applicable. Stand the bars up in a dry area with at least an inch of room between each other to allow for air circulation and let them sit for 5 or 6 weeks. This will allow the soap to complete the saponification process and the soap will lose some of its water during this time, making the bar harder.
– Always wash and rinse your jars and any other supplies that had lye or soap batter in them with warm running water. I wash the tools a second time in my dishwasher but be sure you thoroughly cleaned them in the sink first.